How to Set Up Dlink WiFi Extender? Let’s Install It!
Setting up a Dlink WiFi range extender is an easy and simple process. This WiFi repeater is like a booster that extends the network range in your house. But to use this incredible networking device, you have to complete the Dlink WiFi extender setup in your house correctly. We will provide some straight-forward paragraphs that contain the Dlink WiFi signal repeater hardware specification, setup and configuration of settings and networks. Let’s dive into this ‘how to set up Dlink WiFi extender’ blog and start with hardware specification of the Dlink extender.
Specification of Dlink Repeater
WiFi Ethernet extender is a plug-in device, in which you don’t need to use power cord to supply electricity. You just have to plug the main unit into a wall socket to power it on. You will find some other options like buttons, LED and ports on the repeater. So, let’s learn what you get on the extender.
- On the front, you will see LED light, which indicates the overall status of the WiFi extender.
- At the side of the networking device, you will find WPS button and power On/Off button.
- Under the device, you will get an Ethernet port, which you can use to connect the router.
So, these are the specifications of WiFi long range WiFi extender. Now, let’s see how to set up Dlink WiFi extender.
How to Set Up Dlink WiFi Extender?
This section has two short sub sections, which contains the information about the hardware installation and configuring settings and networks of the WiFi extender. We will start with the hardware setup of the Dlink device.
Hardware Installation
Extender works when it is connected to the WiFi router. It is the networking device, where they receive WiFi signals and they expand the range of the signals. So, in this subsection, we will discuss how you can link your extender to the router without any error.
- To link you have to choose an optimal location, where no networking interruption device like electronic devices nearby.
- So, do check there is no electronic device near to the router and chosen spot of the extender.
- After that use an Ethernet cable to connect extender to the router.
- You must insert the cable to the router’s LAN port and WAN port of the extender (given under the device).
- Then, just plug the Dlink networking device to the electricity wall socket to give power to the extender. After that, you need to press the power button (given on the side of the networking device)
This is the end of the first sub section. Now, let’s configure the settings of the Dlink WiFi extender with the help of the web interface utility using your computer and complete this ‘how to set up Dlink WiFi extender’ blog.
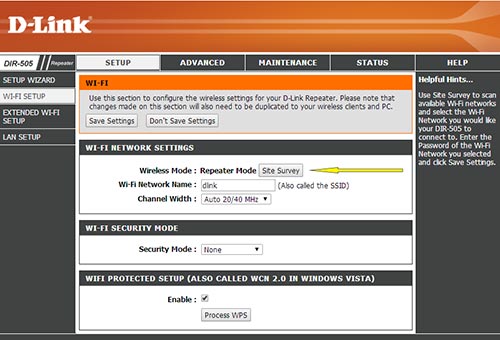
Configure Settings
In this sub section, you will get information about Dlink WiFi extender’s interface. We are providing simple steps to manage the settings and networks through your computer.
- At first, you have to link your computer to the extender via an Ethernet cable.
- Then start your desktop and search dlinkap.local in the web browser of your computer.
- Dlinkap.local will take you to the login page of the Dlink WiFi extender interface.
- Desktop screen will show you the user details field blanks. You have to enter the user credentials to get inside to interface.
- Dashboard of the extender’s interface will allow you to manage the settings and networks.
- You can also update the firmware and change the username and password from this interface.
Let’s Sum Up
Let’s sum up this informative blog in which you have you have learned how to set up Dlink WiFi extender. In this setup process, you have seen sections like specification, hardware installation and configure settings of the WiFi range extender. Hopefully, you have read all the information and instructions to set your Dlink device. After completing the installation, you will experience fast internet network connection in every corner of your house.